


Integrate ServiceNow and Ansible Tower in 10 minutes
Call an Ansible Tower Job Teamplate with custom extra vars via ServiceNow catalog item... in 10 minutes!

A coworker asked about showcasing Ansible Tower, specifically integration between Ansible Tower and ServiceNow. With minimal exposure to ServiceNow, minus operatione as a requestor, this took a bit of time but far less than expected. Before starting make sure you have all prerequisites.
Prerequisities
- ServiceNow Developer Instance
- You’ll need to sign-up for a developer account, but ServiceNow is generous enough to provide you with a free ServiceNow instance, with a build of your choosing. I opted for the Kingston build, but integration steps shold be similar for others, too.
- Ansible Tower
- If you prefer AWX, that will work just as well, but the official version of Tower may be easier to install.
- External Access to Ansible Tower or AWX
- Your ServiceNow instance will need to reach Ansible Tower’s API. For my own testing I added a simple Port Forward rule on my Ubiquiti ER-X SFP. The extra challenge: Tower/AWX’s API is, appropriately, served over HTTPS. It’s likely you’re running with a self-signed certificate, and it’s also likely ServiceNow prohibits addition of custom certs to your developer instance. A quick solution, if hosting at home, is to leverage Cloudflare Universal SSL
Ansible Tower Configuration
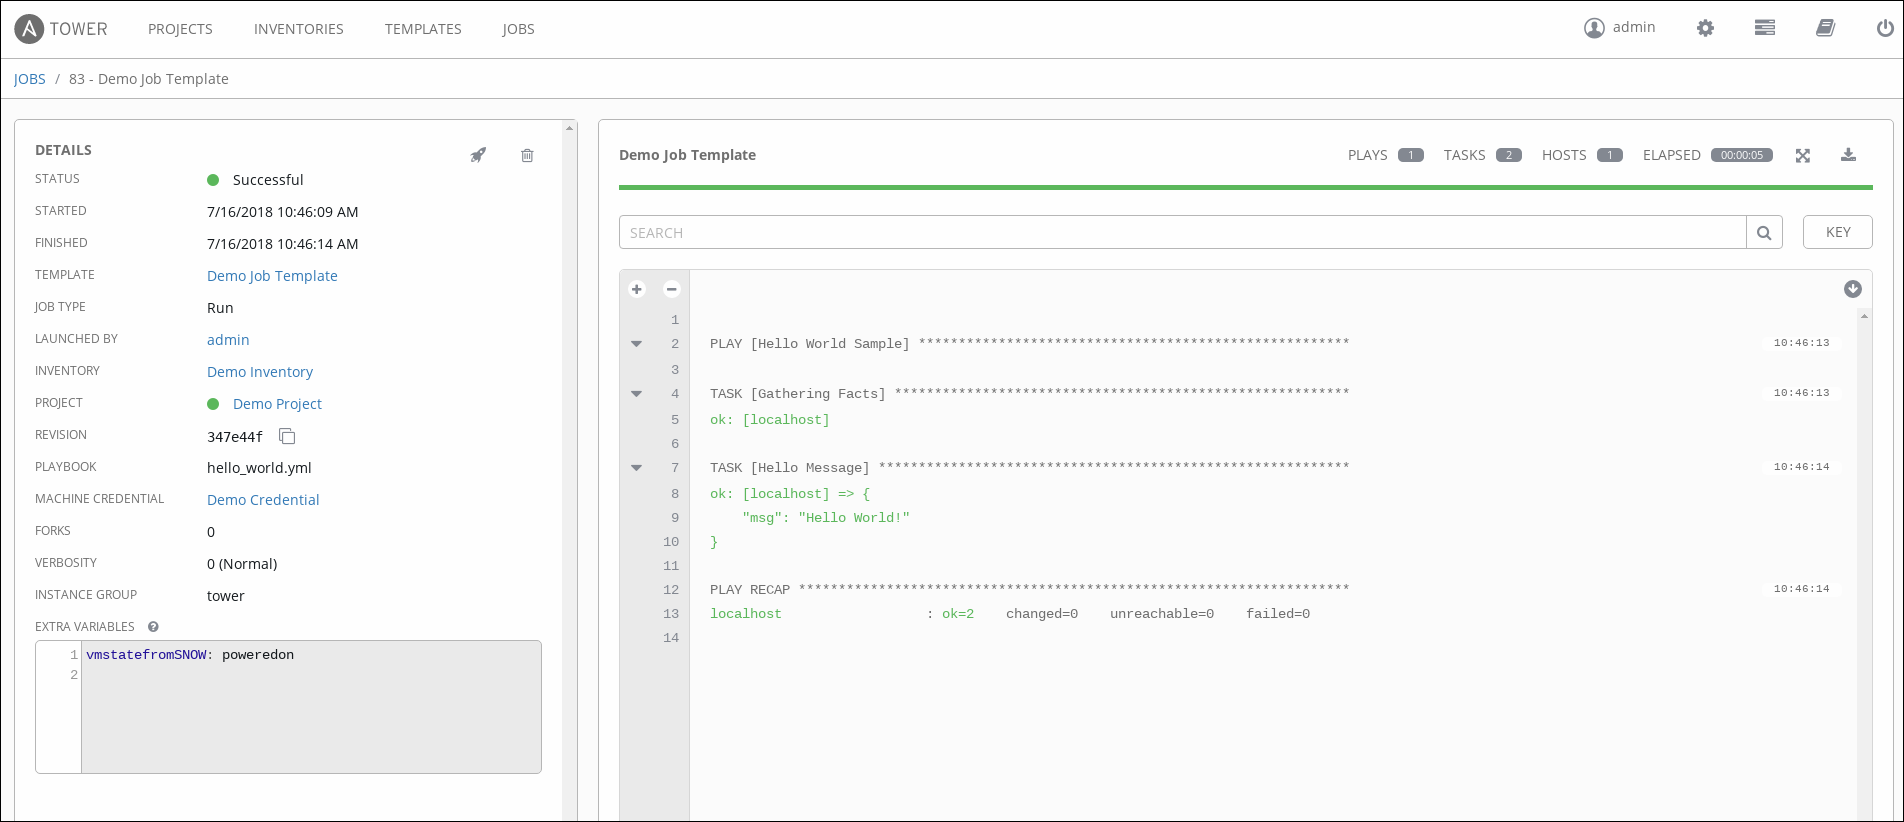
- Confirm “Demo Project”, “Demo Inventory”, “Demo Job Template”
- Set Prompt on Launch for the “Demo Job Template” Extra Variables section
- Obtain the Job Template launch URL (e.g. https://tower.liveaverage.com:8443/api/v2/job_templates/5/launch/ )
- Test (via curl) Job Template Launch execution from the API prior to initiating via ServiceNow integration.
- Test (via curl) Job Template Launch execution from the API, providing custom Extra Variables
ServiceNow HTTP Method Configuration
- Assuming you’ve requested your developer instance and it’s “awake,” login as an administrator
- Define a new Outbound REST Message ( System Web Services > Outbound > REST Message )
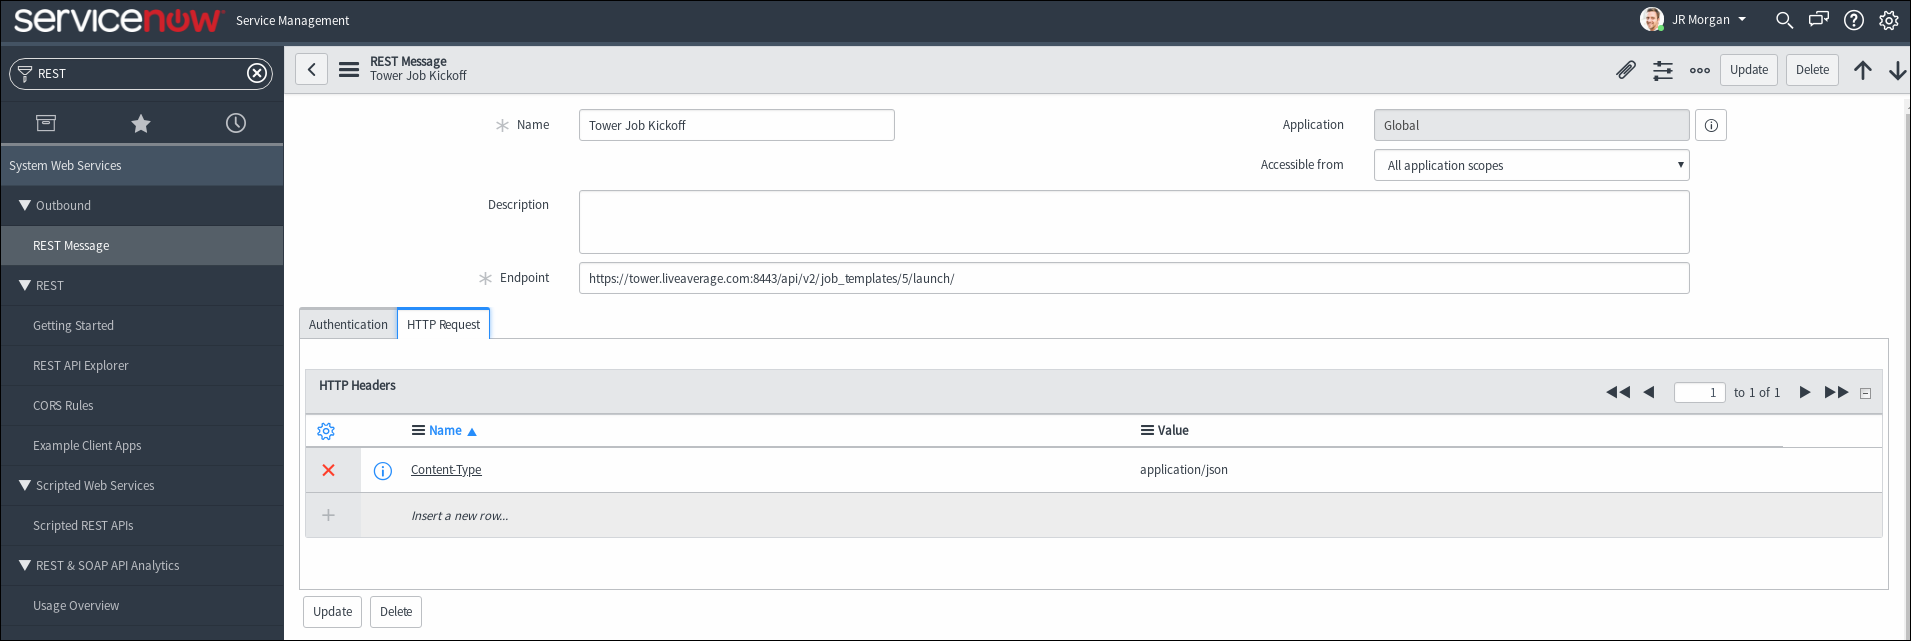
1. Set the Endpoint to your Job Template launch URL obtained in step 3 of Ansible Tower Configuration 2. Under Authentication, select type Basic and define a new “Basic auth profile” with a user/password combination that has permissions to launch Ansible Tower Job Templates 3. Under the HTTP Request tab, add a new value:
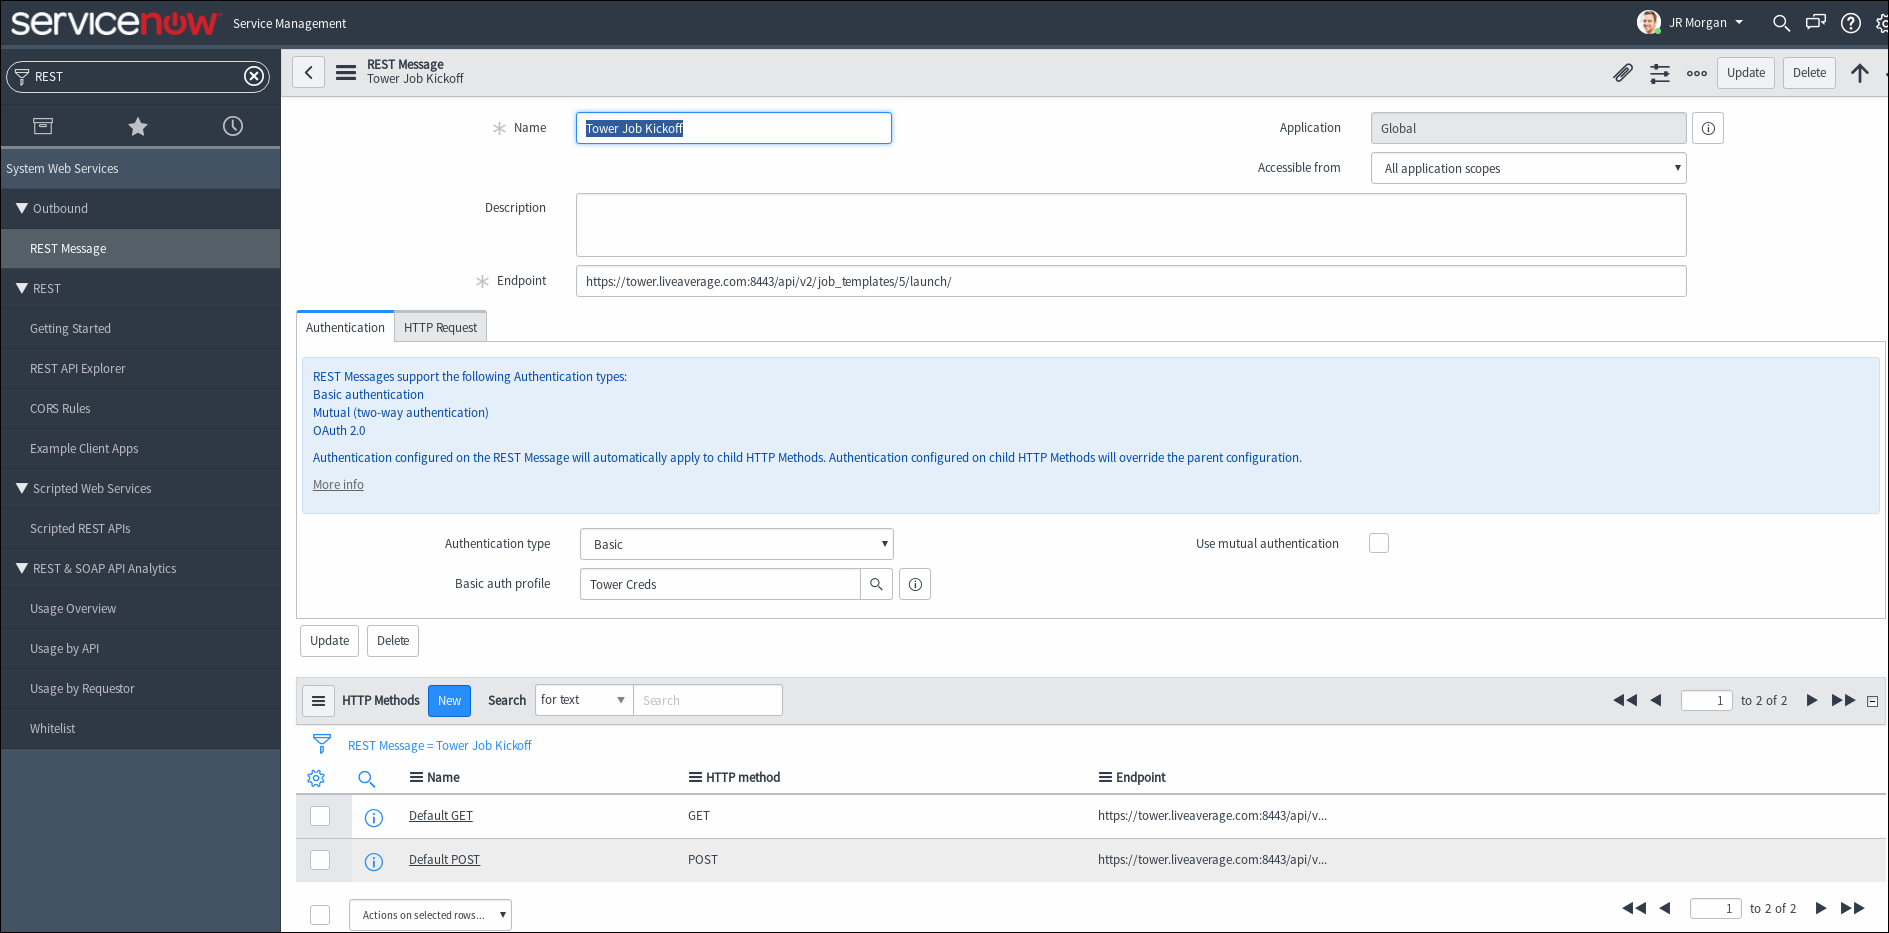
- Content-Type : application/json
4. Under HTTP Methods, create a new method (e.g. “Default POST”) with the following:

- HTTP Method : POST
- Endpoint : Job Template launch URL obtained in step 3 of Ansible Tower Configuration
- Content :
{"extra_vars": { "vmstatefromSNOW": "${vm_state}" } }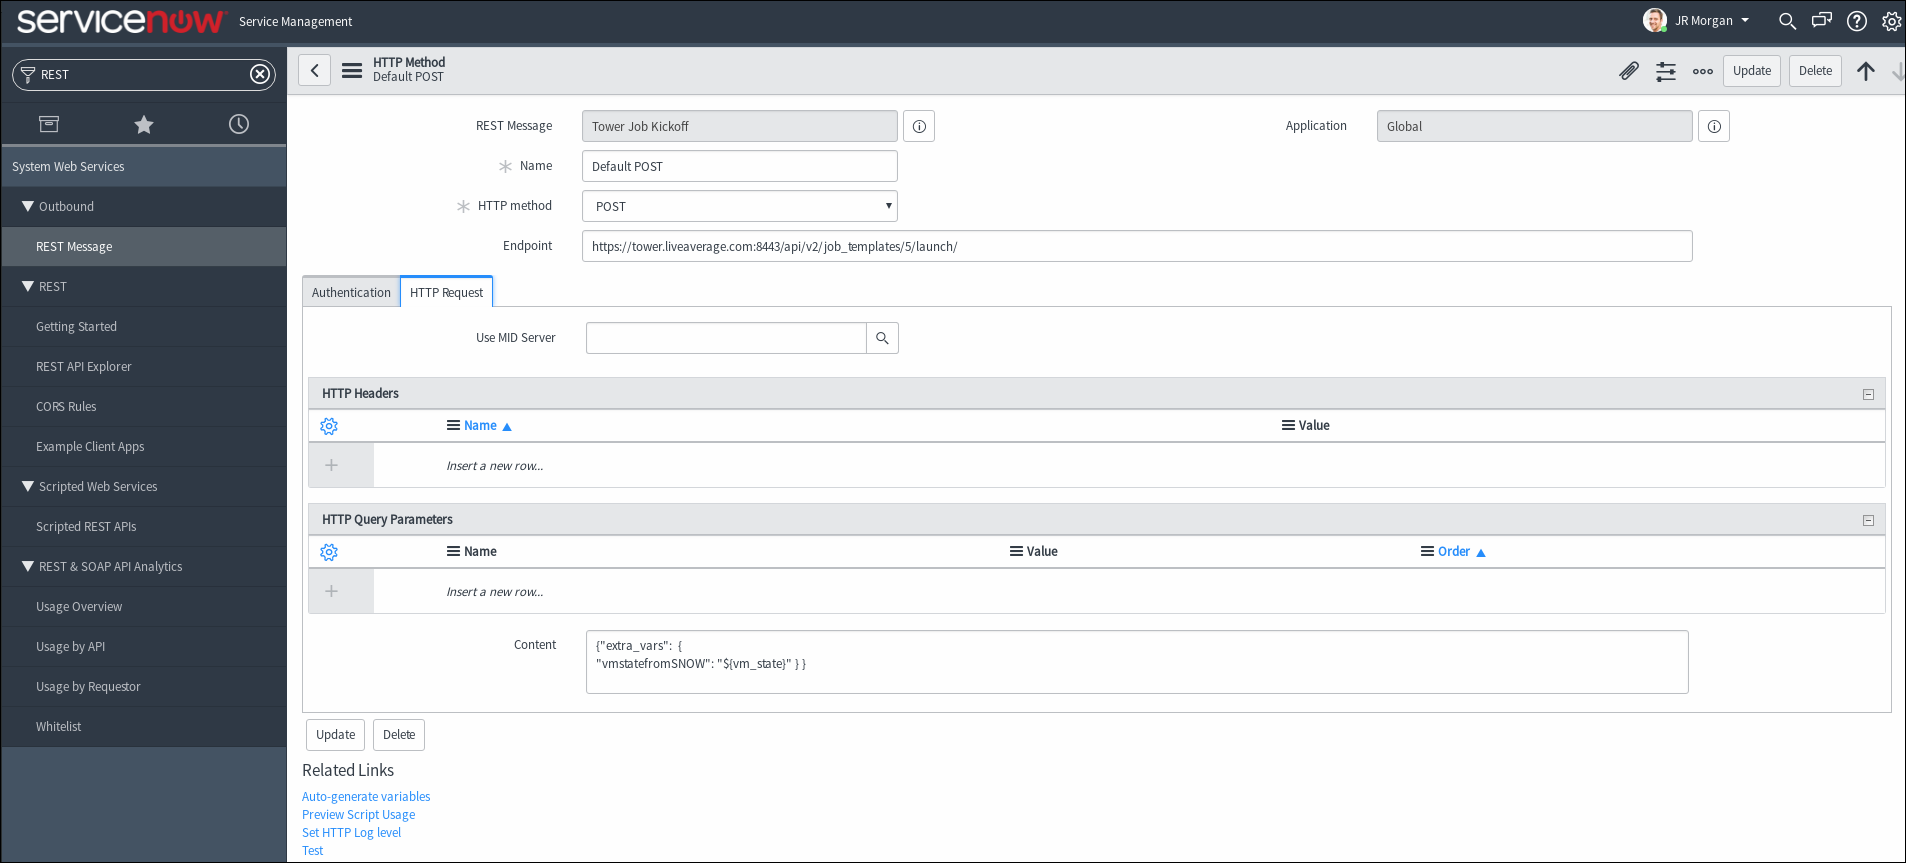
- Variable Substitutions : Click the “Auto-generate variables” option under “Related Links” to auto-create your variable substitution(s)
- After the variable substitution entry is auto-generated, click its name and set a default “Test value” (e.g. ‘poweredon’)
5. Save all changes (if prompted)
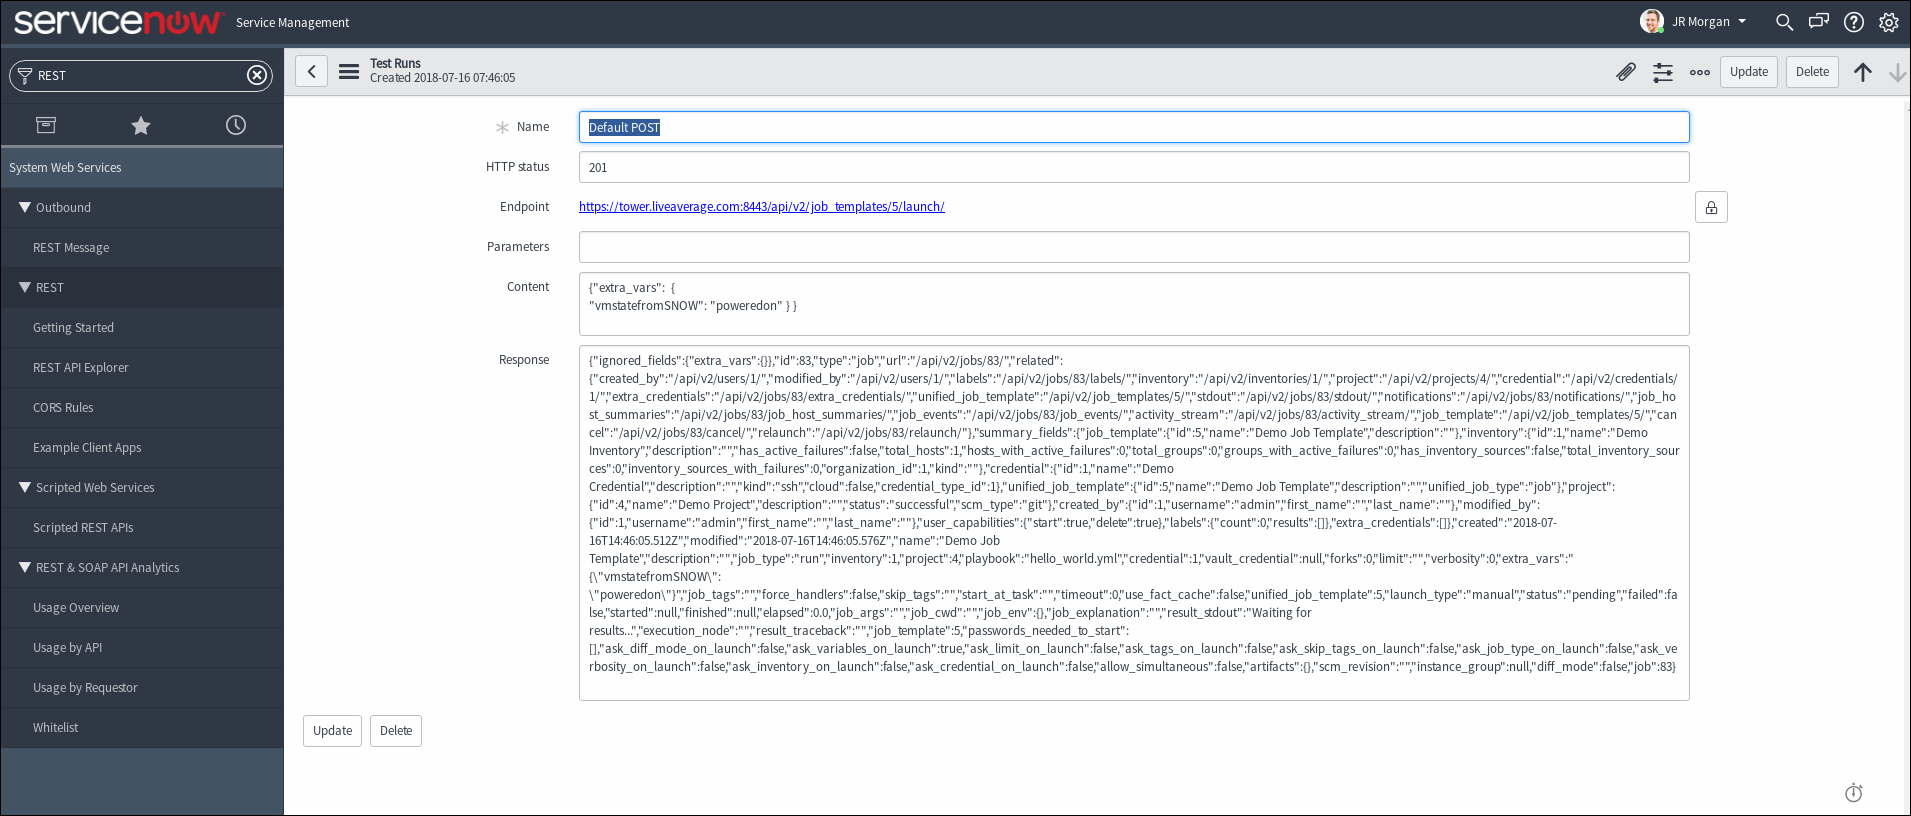
6. While still editing the “Default POST” HTTP Method, click Test under “Related Links” to manually initiate an Outbound REST Message with your default extra variable(s)
- After the variable substitution entry is auto-generated, click its name and set a default “Test value” (e.g. ‘poweredon’)
5. Save all changes (if prompted)
6. While still editing the “Default POST” HTTP Method, click Test under “Related Links” to manually initiate an Outbound REST Message with your default extra variable(s)
- If ServiceNow can reach your Ansible Tower API, your credentials are correct, and your endpoint is correct, you should observe an API-triggered “Demo Job Template” launch
7. While still editing the “Default POST” HTTP Method, click Preview Script Usage under “Related Links”. This should generate a snippet such as:
 8. Keep this script snippet handy for the next section covering Catalog Item Configuration
try {
 var r = new sn_ws.RESTMessageV2('Tower Job Kickoff', 'Default POST');
 r.setStringParameterNoEscape('vm_state', 'poweredon');

//override authentication profile
//authentication type ='basic'/ 'oauth2'
//r.setAuthentication(authentication type, profile name);

//set a MID server name if one wants to run the message on MID
//r.setMIDServer('MY_MID_SERVER');

//if the message is configured to communicate through ECC queue, either
//by setting a MID server or calling executeAsync, one needs to set skip_sensor
//to true. Otherwise, one may get an intermittent error that the response body is null
//r.setEccParameter('skip_sensor', true);

 var response = r.execute();
 var responseBody = response.getBody();
 var httpStatus = response.getStatusCode();
}
catch(ex) {
 var message = ex.getMessage();
}
- Content-Type : application/json
ServiceNow Workflow Configuration
- Navigate to Workflow > Workflow Editor
- Click the “New Workflow” button
- Name the new workflow, and select Requested Item [sc_req_item] for the Table
- In the Stages section, you can leave all options at their default setting
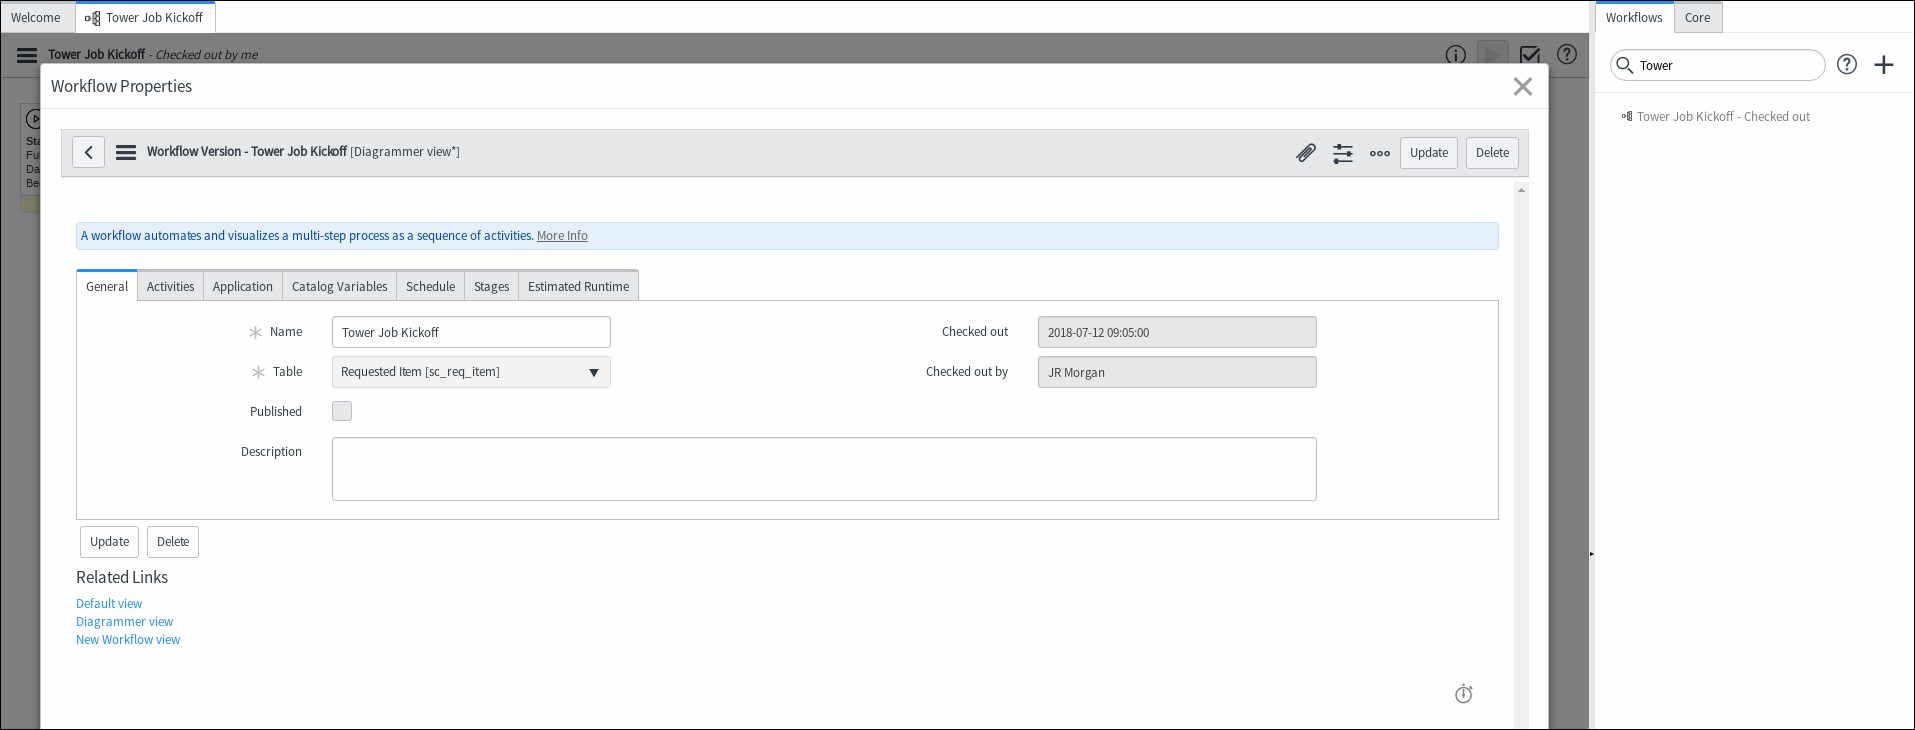
- Click the “Submit” button
- When the Workflow Editor appears, click the Core tab and search for “Script” (under “Utilities”)

- Drag the Run Script component to the workflow stage
- Provide a “Name” and, optionally, a stage (e.g. “Fulfillment”) - Paste the script from the previous section into the “Script” text area - On the line immediately following instantiation of a RESTMessageV2 object, add the following:

r.setStringParameterNoEscape('vm_state', current.variables.vm_state);- This will ensure the
vmstatevalue set by the requestor is passed along as an extra variable to your Ansible Tower Job Template launch - Click “Submit”
- This will ensure the
- Click the existing arrow connector between “Begin” and “End” and press the “Delete” key
- Drag a new connection from the yellow square at “Begin” to the the “Run Script” box; repeat the process to connect “Run Script” to “End”

Great! You established a primitive workflow and we’re ready to associate it with a catalog item!
ServiceNow Catalog Item Configuration
- Navigate to Maintain Items ( Service Catalog > Catalog Definitions > Maintain Items )
- Click New to establish a new Catalog Item
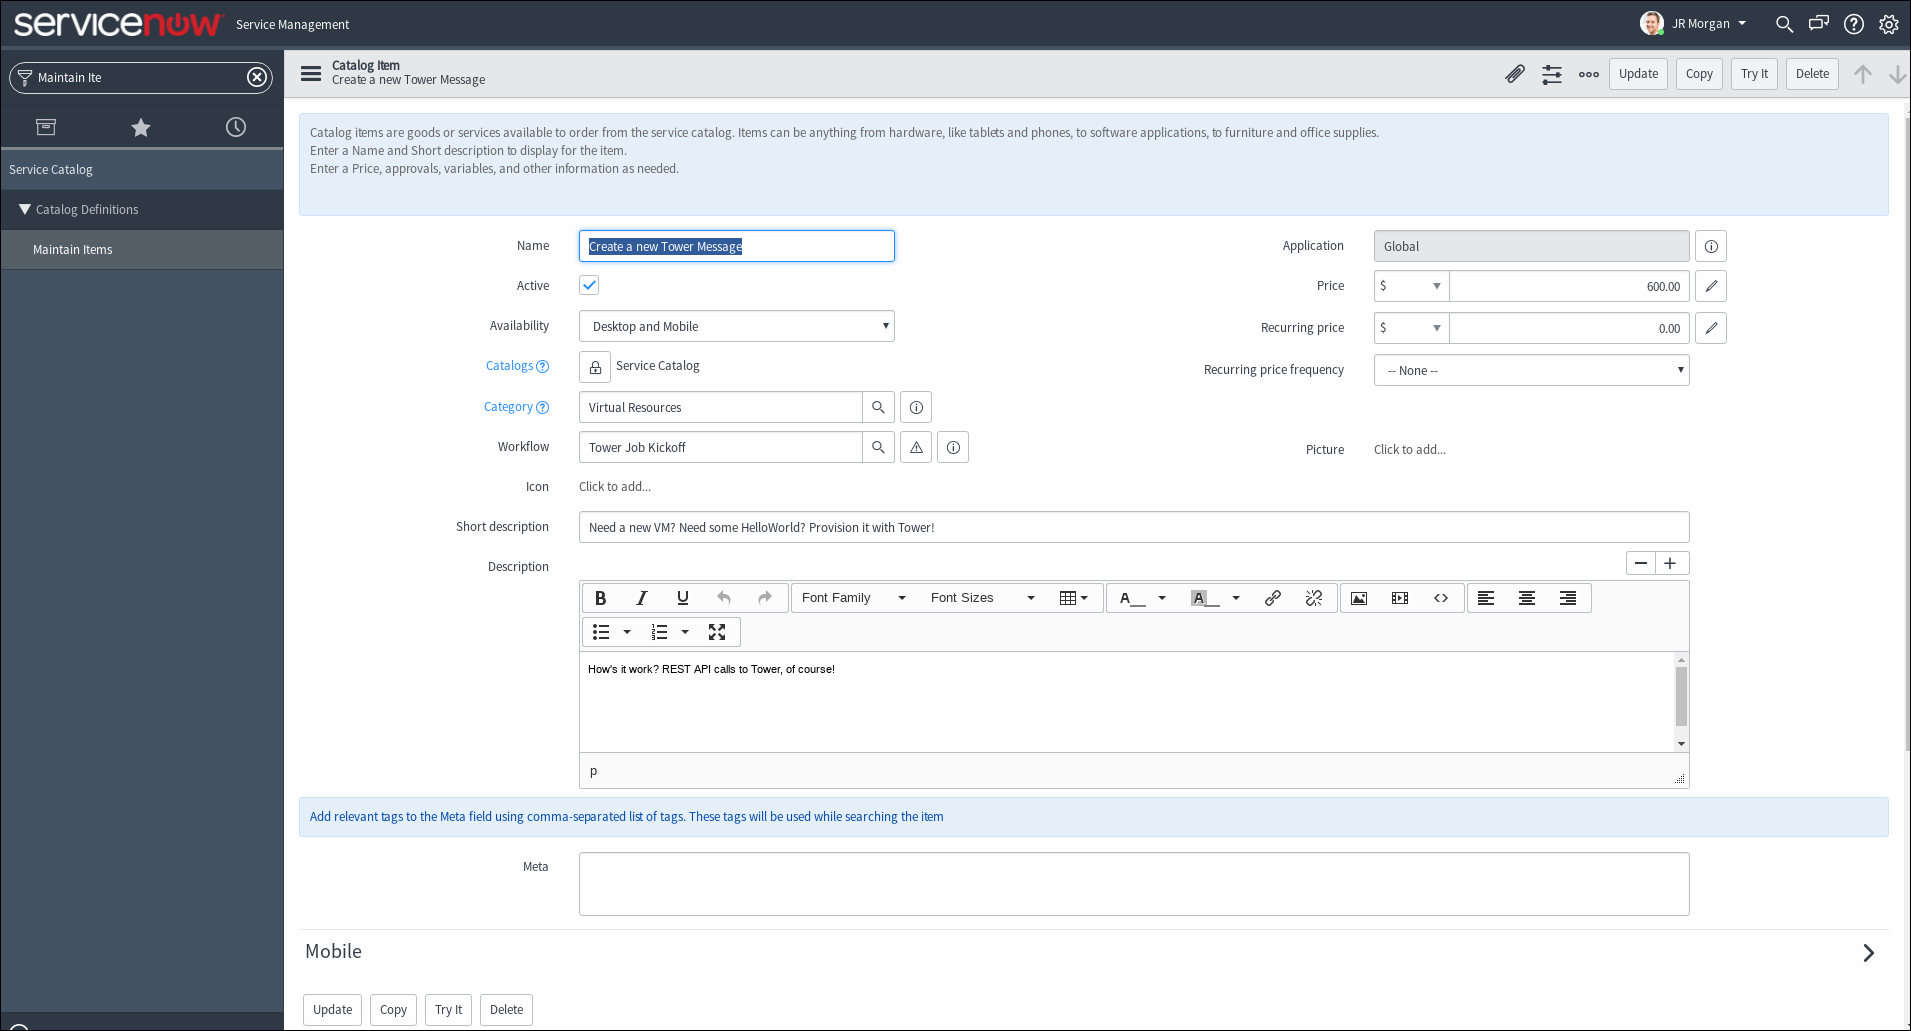
- Most of these options are aribtrary for this integration example – The important, required settings are:
- Workflow
- Select the workflow created in the previous section](#snworkflow) - Price
- Make sure this value is less than $1,000 or your sample orders will require approval before being processed - Variables
- Click New to create a new variable, which will translate to a new form element associated with your catalog item
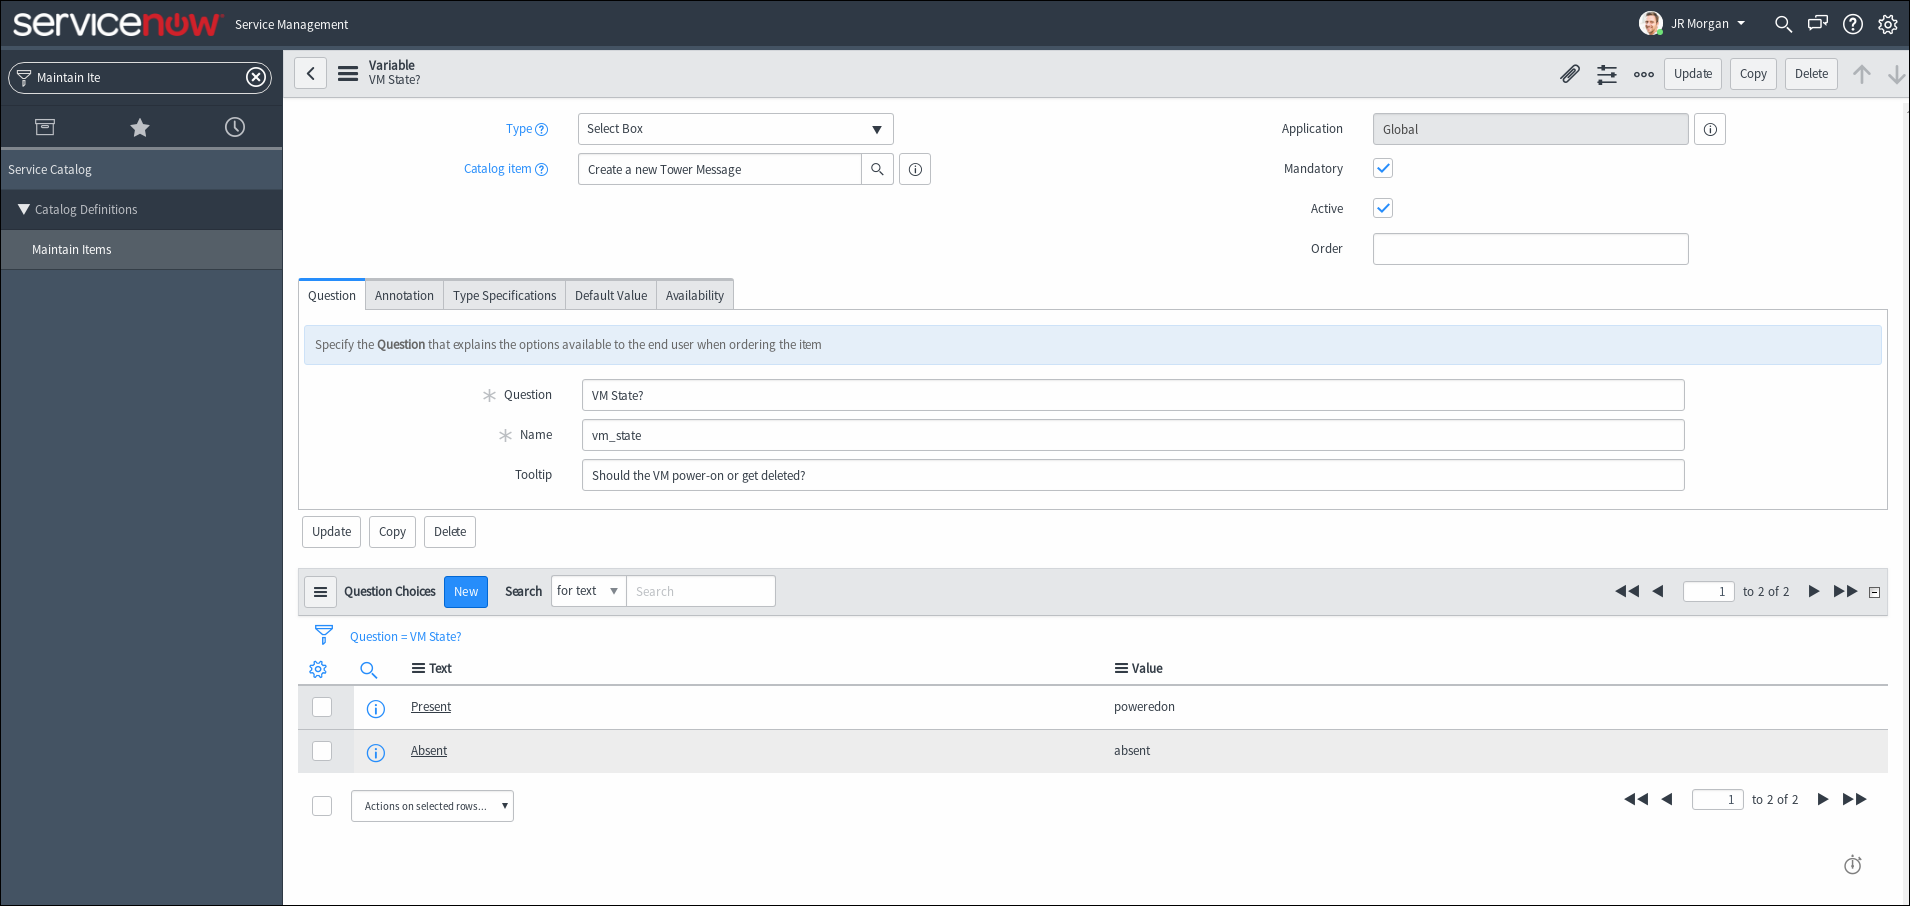
- Add Question Choices with appropriate values to your variable definition. In this case I’m setting up to provision or decommission a VM with vsphere_guest options “poweredon” or “absent”, but since we’re simply calling the Demo Job Template these choices & values are arbitrary
- Click Submit when finished
Sample ServiceNow Order
- Navigate to Self-Service > Homepage
- Search the catalog for the name of your item created in the previous section (e.g. Tower)
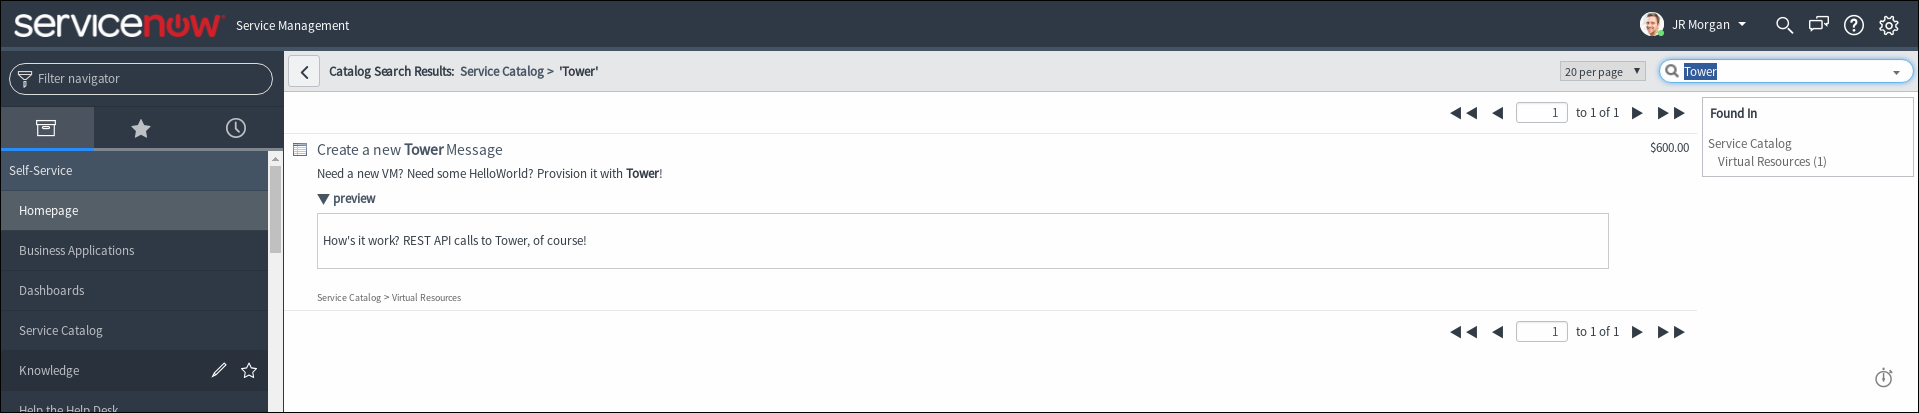
- Select the catalog item and input a selection for the variable you defined in the previous section (e.g. “Absent”)

- Click the Order Now button
- Observe the “Order Status” page, specifically the “Stage” field
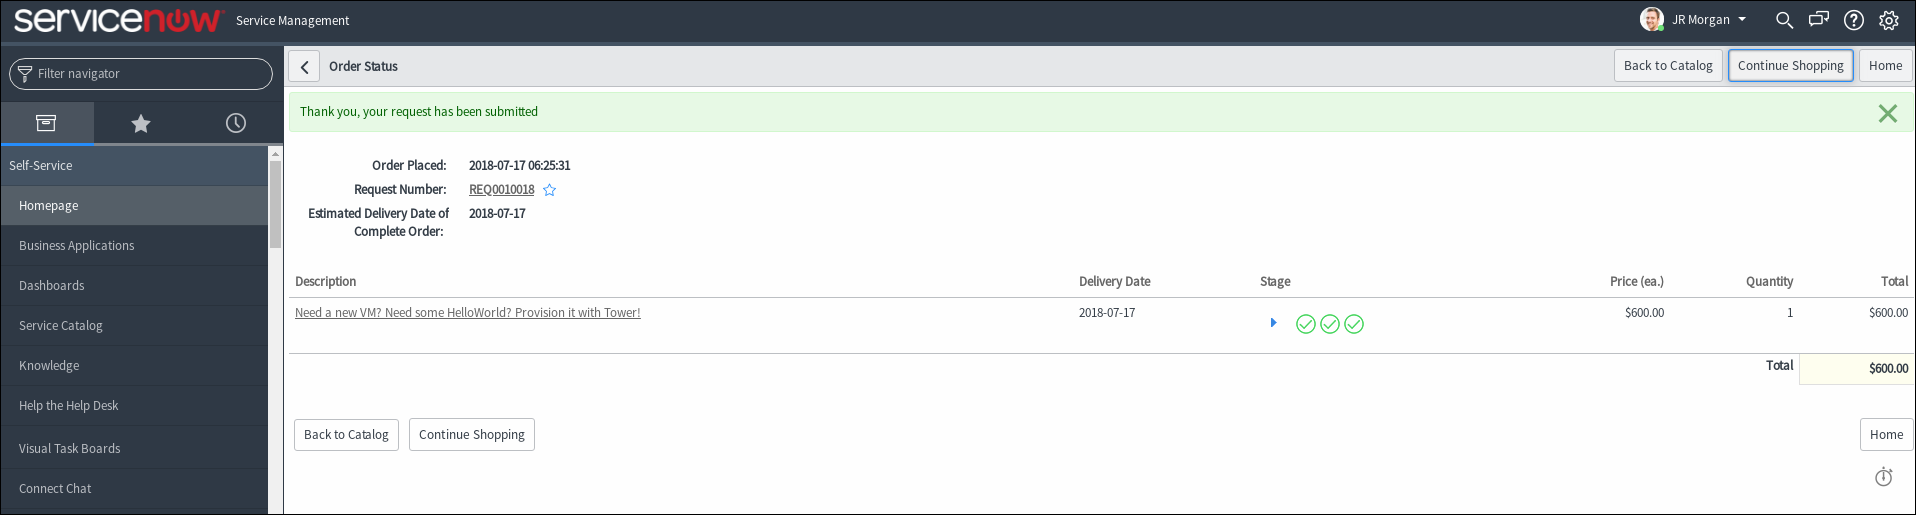
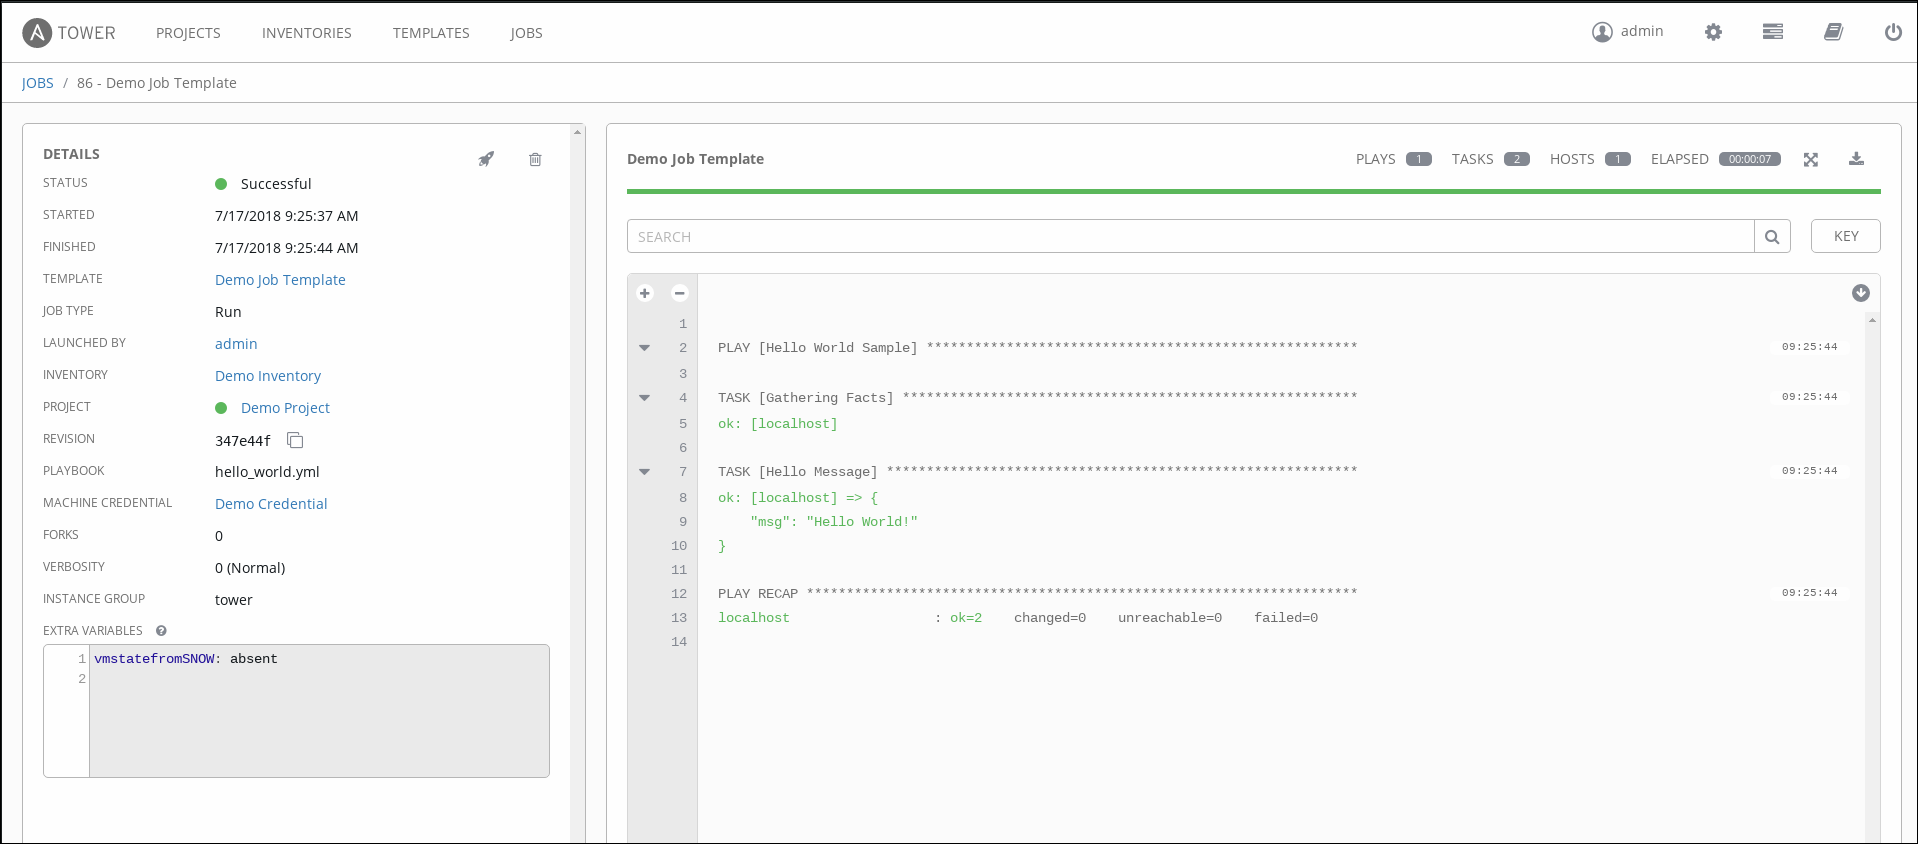
- Even before the order is fulfilled, you should be able to see a new Tower job launch, accompanied by an appropriate extra variable value you selected in the order form
Feature Image by [Andrew Malone] (https://www.flickr.com/photos/andrewmalone/2177361233/in/photostream/) is licensed under CC BY 2.0
Share this post
Twitter
Google+
Facebook
Reddit
LinkedIn
StumbleUpon
Pinterest
Email